So long as you have an the help of an understanding partner who will give you good feedback, you can quickly learn to apply therapeutic back massage techniques (Swedish Massage: Effleurage and Stripping, Trigger Point Release) that rival those of massage experts.
Required Equipment for Therapeutic Back Massage:
- Warm, quiet, relaxed environment.
- Firm comfortable surface such as a (firm) bed, massage table or floor mat.
- Massage Oil. Baby oil will do fine for a starter.
- Towels: to lie on, and also to cover the body.
- Cushions or pillows.
Massage Tips:
- Massage oil decreases the friction created on the skin and prevents the pulling of hairs. Don't use too much: The less oil, the greater the friction and the deeper the pressure.
- Use slower movements for a soothing or calming response.
- When applying pressure with finger or thumb, provide support with the other fingers and thumbs. Otherwise you will wear your thumbs out!
Massage Patient Comfort:
| |
| |
- Minimal direct pressure on bony processes.
- Avoid broken skin, blisters or areas of possible infection.
- See also Back Pain Red Flags
Massage Benefits:
- Relaxation, releasing of tight muscles.
- Emotional comfort and stress management.
- Increased body awareness.
- Improved circulation, and improved lymphatic drainage for release of toxins.
Therapeutic Back Massage Technique Tips:
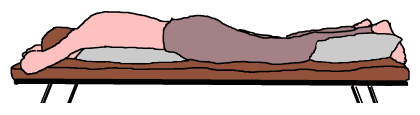
Lie the partner on their belly on a firm, comfortable surface (see diagrams below). Make sure you can reach their whole back without straining your own.
Back Massage Technique, Tip 1:
Whole Hand Effleurage
| Warm the massage oil in your hands, and apply a modest amount (see tips, above ) with whole hand "effleurage" (definition - smooth rhythmic stroking): Use the whole surface of both hands (see diagram). Stroke reasonably firmly upwards from the lower back all the way up to the neck, then (gentler pressure), circle around and back to the lower back region (5 to 10 minutes). | 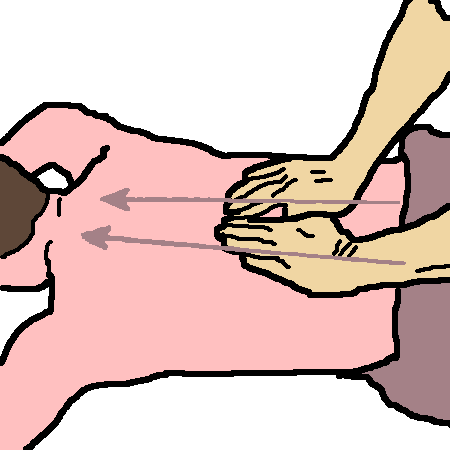 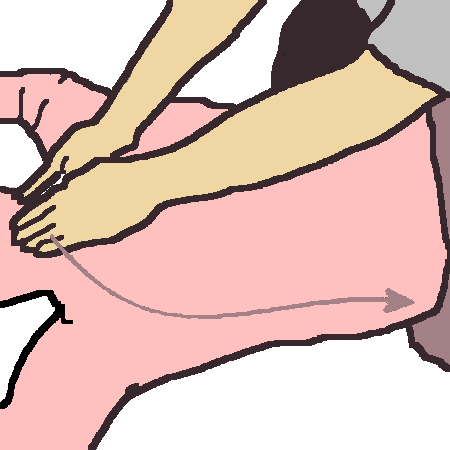 |
Back Massage Technique, Tip 2:
Effleurage using Heel of the Hand
| There is a smaller area of contact, so the pressure is deeper. Both hands work in circles - start at the lower back. Move in a circle, first outward, then upward and return to the center. Gradually progress to the upper back (5 minutes). | 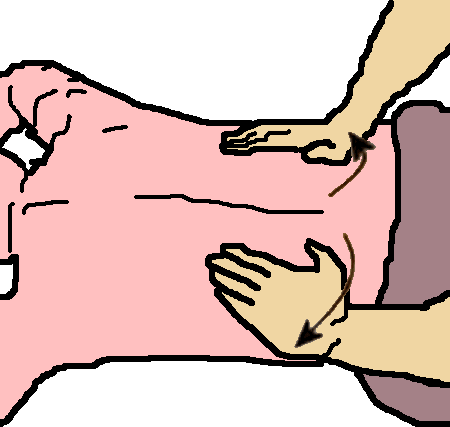 |
Back Massage Technique, Tip 3:
Effleurage using reinforced Fingers
| (Smaller area of contact, so deeper again - see diagram). Stand on the opposite side to the one that you are working on. I suggest you stand on the right side first. Push with the flats of your fingers (one hand on top of the other) away from the center line, then glide back toward the spine. Start at the lower back, and work up to the upper back (five minutes). | 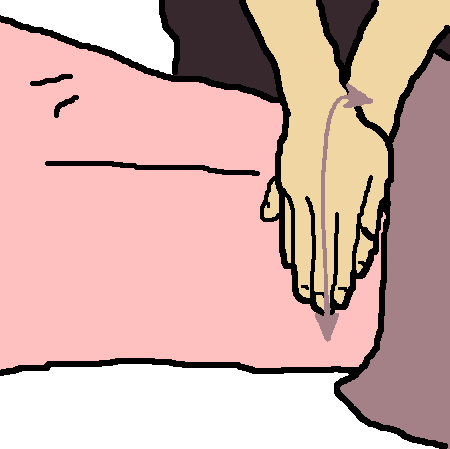 |
Back Massage Technique, Tip 4:
Stripping, using the Reinforced thumb
| Glide with deep sustained pressure up the full length of the "sausage shaped" muscles either side of the spine (see diagram). Back off the pressure a little as you cover the neck. Move slowly and deliberately, feeling for knots or sensitive spots as you glide from lower to upper back. Three times each side; alternate with a couple of minutes of effleurage (techniques one to three above), and repeat the stripping. |  |
Frictions, using the Reinforced Middle Finger:
| Firm deep movements either side of each spinous process. Start to the side of the lower spine and move upward. Apply 5 frictions at each spot - more if over a sore spot. | 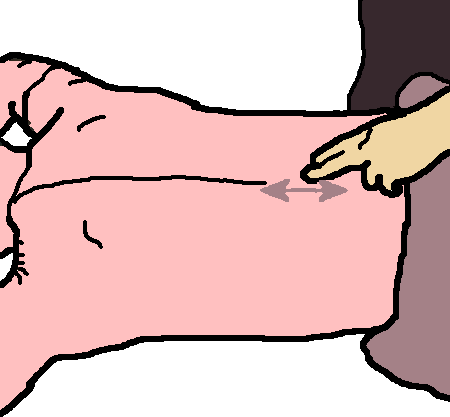 |
"Effleurage" using Forearms
| Apply firm downwards pressure (see diagram), and move the arm closest to the head up to just below the shoulder blades. 6 strokes. For the first stroke, be aware of the possibility of lower back pain | 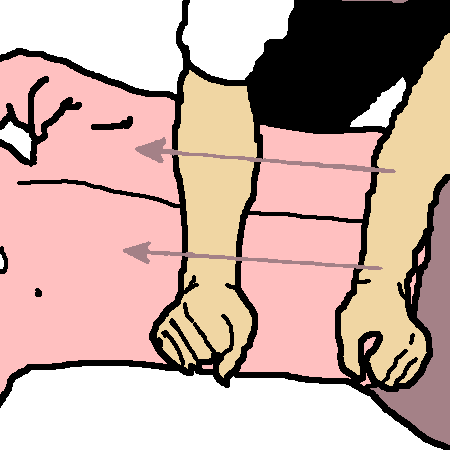 |
Trigger point release using sustained pressure of the of the reinforced thumb.
| Let the patient's pain be your guide. Place your thumb over any tender spots or knots that your patient may have told you about or that you may have felt, and press firmly and with increasing pressure thus: Gradually increase the pressure until the pain is 6 or 7 on a scale of one to ten. Hold that pressure until the pain lowers to about 4/10 (takes about 5 seconds). Immediately (don't stop the pressure), increase again until the pain is 6 to 7 on the scale of 10, and again hold until the pain subsides to 4/10. Repeat step two. This is painful, but you can't do much harm to the patient - quite the reverse: muscle and back pain (upper or lower)may miraculously disappear. Your thumb is more likely to suffer, so make sure that you back it up with the fingers of the other hand, and after each trigger point release, give your thumb a bit of massage too. | 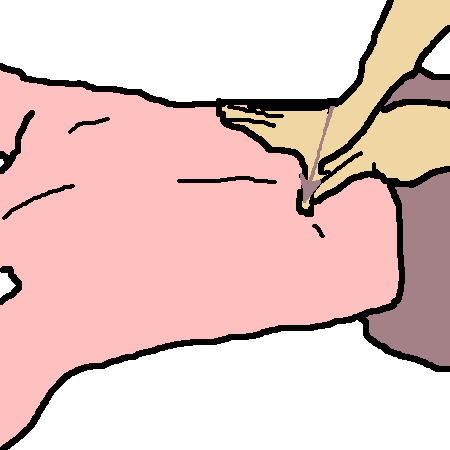 |
Back Massage Technique, Tip 8:
Finishing with Effleurage
Apply effleurage (stroking moves) with supported fingers (technique 3 above), then effleurage with the heel of the hand (technique 2 above), then full handed effleurage (technique 1 above). This will enhance the good that you have done with the stripping and trigger point release. Then leave the patient quiet for a few minutes.  |
Patient Advice:
For the five days after the massage, encourage the patient not to sit, stand still or run, for longer than half an hour at a time; but rather to take a short walking break, and to sip water frequently.
Back Pain Red Flags
If your massage patient has back pain (upper or lower) related to any of the following, refer them to a medical specialist. See also:- Back Pain Red Flags
- Younger than 20 or older than 55 and getting back pain for the first time.
- Pain after a violent injury, e.g. road traffic accident.
- Pain is constant and getting worse.
- Pain is in the upper part of the spine.
- Cancer in the past or at present.
- Taking (Cortico)steroids.
- Drug abuser, or HIV infected.
- Generally unwell or feverish.
- Significant weight loss.
- Continue to have great difficulty bending forwards.
- Nerve related problems other than pain: loss of sensation (especially of the area that would sit on a saddle - so called saddle anaesthesia), loss of power, urinary or bowel incontinence.
- Obvious structural deformity of your spine.
- Debilitating pain that is not reducing after 4 -6 weeks. (easyvigour.net.nz)

